
Вход на сайт
Новости
XMD перевод документации
пятница, марта 24, 2017 - 10:01
Содержимое:
Первый вариант перевода здесь. Пока не причесано, но работа продолжается...
Недокументированные возможности Android
пятница, марта 10, 2017 - 09:05
Содержимое:
10 возможностей Android, о которых вы могли не знать https://hi-tech.mail.ru/news/android-features/
Вход на сайт - через соцсети!
среда, марта 1, 2017 - 17:31
Содержимое:
Запущен модуль авторизации пользователей через социальные сети - OneAll Social Login. Пока вход через ВКонтакте и mail.ru
Страницы
Andriod Studio Tips - список типичных действий или секреты эффективной работы
Попытался отобрать советы из Android Studio Tips, перевести их, плюс что-то добавил из других источников и собрал все в одном месте. Вот что получилось!
Ссылки на дополнительную информацию:
http://info.javarush.ru/idea_help/2013/08/07/IntelliJ-IDEA-%D0%9C%D0%B0%...
https://www.jetbrains.com/help/idea/2016.3/intellij-idea-pro-tips.html
https://www.jetbrains.com/help/idea/discover-intellij-idea.html
Для интереса - английские названия кнопок на клавиатуре
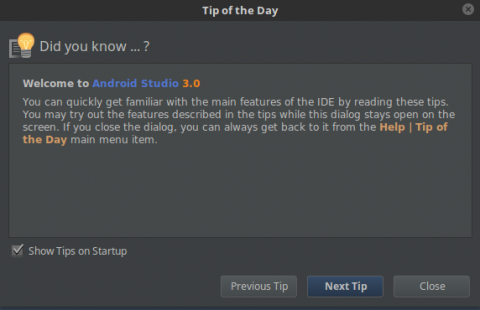
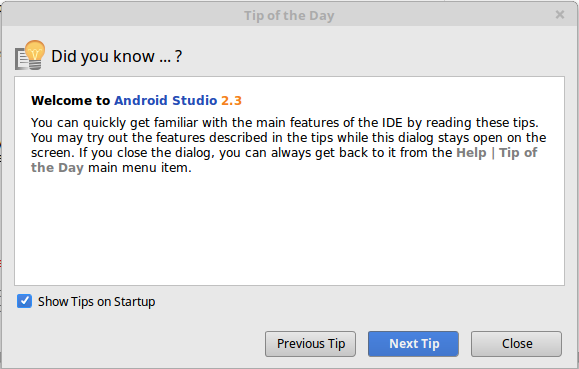
Интегрированная среда разработки (англ. IDE - Integrated Development Environment) Android Studio после установки всегда предлагает свою помощь:
"Вы можете быстро познакомиться с возможностями IDE с помощью этих записей (англ. tips and tricks - советы и приемы). Попробовать возможности можно не закрывая этот диалог. Если Вы закрыли диалог, открыть его можно из меню Help | Tip of the day."
Настройки IDE, поиск, быстрые перемещения, действия и др.
| English | Русский + картинка (опционально) |
|---|---|
Первоначально на главном экране Android Studio не отображается ни один проект или файл. Однако, при создании проекта открывается вид (или представление) Project. Как предлагает Android Studio, нажмите Alt+1, чтобы открыть представление Project. Вы также можете открыть его, нажав кнопку Project с левого края.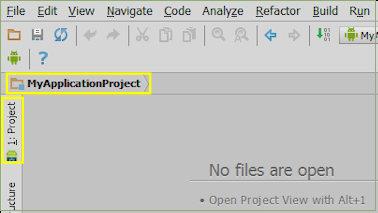 https://www.packtpub.com/mapt/book/application_development/9781783285273... |
|
| В Android Studio есть вкладка Captures, этот инструмент поможет при исследовании содержимого памяти устройства, с помощью него можно сделать и сохранить снимок "кучи" Java - описание здесь - https://stackoverflow.com/questions/46221175/what-is-the-purpose-of-capt... | |
| The speed search is available in all the tree views: just start typing and you'll quickly locate the necessary item. | Быстрый поиск доступен во всех "древовидных" представлениях информации: просто начните набирать то что помните и будете перемещаться к следующему пункту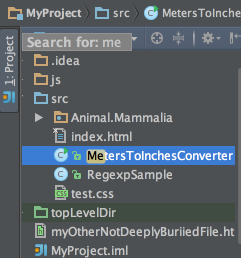 |
| В Android Studio "из коробки" поставляется 3 темы: IntelliJ, Darcula, Windows. По умолчанию, используется тема IntelliJ со светлым фоном. Чтоб переключиться в темную тему (Darcula), открываем File | Setting (Ctrl+Alt+S), открываем Appearance & Behavior | Appearance и выбираем в выпадающем списке Theme. | |
| Для переключение между проектами выберите в меню File->Close project, а затем, в диалоге Welcome to Android Studio выберите File->Open an existing Android Studio project | |
| You can quickly open an Eclipse project by selecting a .classpath or .project file in the File | Open dialog. The corresponding Eclipse project is imported with default settings, without launching the wizard. | Открыть быстро проект Eclipse можно выбрав файл .classpath или .project в диалоге File | Open |
| Ctrl + Z = Undo (Отменить действие), Ctrl + Shift + Z = Redo (Возврат отмененного действия) | |
| http://stackoverflow.com/questions/20193319/how-to-see-which-files-have-... | Ссылка указывает на топик ресурса stackoverflow, где показан способ отметить вкладки в редакторе, файлы в которых изменились с момента последнего сохранения, как это принято в Eclipse. Делается это в меню File > Settings > Editor > General > Editor Tabs. Отмечаем флажок "Mark modified tabs with asterisk". После этого вкладки с изменениями отмечаются звездочкой (*) перед названием файла. После этого становится видно сохранен файл или нет. |
| To help you learn the purpose of each item in the main menu, its short description is shown in the status bar at the bottom of the application frame when you position the mouse pointer over this item. | Чтобы помочь вам узнать назначение каждого элемента в главном меню, его краткое описание отображается в строке состояния в нижней части фрейма приложения, когда вы позиционируете указатель мыши над этим элементом. |
| You can quickly find all places where a particular class, method or variable is used in the whole project by positioning the caret at the symbol's name or at its usage in code and pressing Alt+F7 (Edit | Find | Find Usages in the popup menu). | Вы можете быстро найти все места, где конкретный класс, метод или переменная используется во всем проекте путем размещения курсора на имени переменной, метода (вызова) в коде и нажав Alt+F7 (Edit | Find | Find Usages в контекстном меню ). |
| To import a code sample into Android Studio: In the Android Studio menu, select File | Import Sample to open the Import Sample wizard. Select a sample to import and click Next. Specify the application name and project location if different from the displayed settings. Click Finish. | Для импорта примера в Android Studio в меню File | Import Sample выберите его имя и расположение и нажмите Finish. |
| To quickly find a menu command or toolbar action, you do not need to look through the menus. Just press Ctrl+Shift+A (Help | Find Action on the main menu) and start typing the name of the action. Choose the desired action from the suggestion list. | Ctrl+Shift+A (Help | Find Action) позволяет найти нужный пункт меню в AS путем его поиска, набирая при этом имя действия. Например, предыдущий пункт File | Import Sample.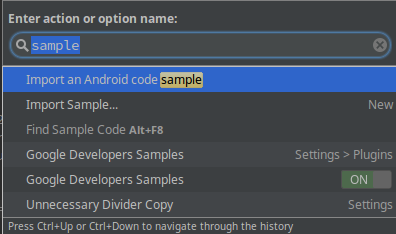 |
| First of all, this IDEA has a nice "Find Usages" command. It can be found in the context menu, when the cursor is on some field, method, etc. Alternatively, you can use the Edit | Find | Find in path… dialog, which allows you to search the whole workspace. Also in IDEA 13 there is an awesome "Search Everywhere" option, by default called by double Shift. It allows you to search in project, files, classes, settings, and so on. Also you can search from Project Structure dialog with "Find in Path…". Just call it by right mouse button on concrete directory and the search will be scoped, only inside that directory and it's sub-directory. |
Прежде всего IDEA имеет отличную команду "Find Usages". Она может быть найдена в контекстном меню, когда курсор находится в поле, методе и т.д. По-другому, Вы можете использовать Edit | Find | Find in path диалог для сквозного поиска по всему рабочему пространству. Также в IDEA 13 имеется классная опция "Search Everywhere", по умолчанию вызываемая двойным нажатием Shift. Это позволяет Вам искать в проекте, файлах, классах, установках и прочее. Также Вы можете искать из диалога Project Structure с помощью "Find in Path…" Просто вызывайте эту функцию через правую кнопку мыши на конкретной папке и поиск будет осуществляться только внутри этой папки и ее поддиректориях. |
| Alt+Home - mooving cursor to Navigation Bar | Alt+Home перемещает курсор в Панель Навигации (панель над редактором), которая позволяет быстро перемещаться по проекту с помощью клавиш - стрелок и Enter |
| If you notice that Android Studio works slowly, consider the possibility to reduce the number of folders under antivirus protection. Each antivirus check in your project consumes resources. You can significantly improve the performance, if you exclude certain folders from the antivirus protection. |
Если вы заметили, что Android Studio работает медленно, рассмотрите возможность уменьшения количества папок, находящихся под антивирусной защитой. Каждая проверка антивируса в вашем проекте потребляет ресурсы. Вы можете значительно повысить производительность, если исключить определенные папки из антивирусной защиты. |
| To quickly find and run an inspection, press Ctrl+Alt+Shift+I and start typing the name of the inspection or its group. Choose the desired inspection from the suggestion list and then specify the desired scope. | Чтобы быстро найти и запустить инспекцию в AS, нажмите Ctrl+Alt+Shift+I и начните набирать имя инспекции или ее группу. Выберите инспекцию из списка и установите параметры поиска. Читать статью о lint |
| You can quickly find a setting you need in the Settings/Preferences dialog, without browsing through the numerous options. Just type some characters that, in your opinion, exist in the option description, and the list of settings will reduce to the matching ones. Select the desired entry, and see the setting that contains the entered characters highlighted: | Вы можете быстро найти требуемый параметр в диалоговом окне Settings/Preferences, не просматривая многочисленные опции. Просто введите некоторые символы, которые, по вашему мнению, существуют в описании опции, а список настроек будет уменьшен до соответствующих введенным символам. Выберите нужную запись и посмотрите установки, содержащие введенные вами символы: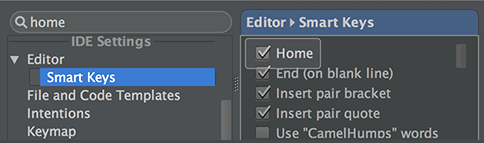 |
| Android Studio simplifies your work with colors in Android resource files. The color properties have the icons of the corresponding color in the left gutter area of the editor. Click color icons to choose the desired color from the color picker. |
Android Studio упрощает работу с цветами в файлах ресурсов Android. Свойства цвета имеют значки соответствующего цвета в области левой "канавки" редактора. Нажмите значки цветов, чтобы выбрать нужный цвет из панели выбора цвета. 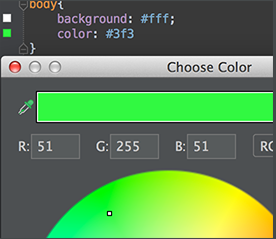 |
| You don't need to guess which index.html file you are looking at... Make the editor tabs and lines in navigation lists stand out using the File Colors page of the project settings. | Вам не нужно угадывать, какой файл index.html вы ищете ... Сделайте выделение цветом для вкладок редактора и строк в списках навигации с помощью страницы File Colors параметров проекта.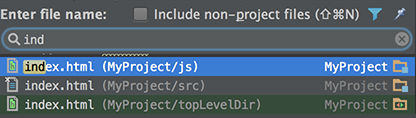 Вот как получилось у меня:.  через меню File->Settings->Appearance&Behivior->System Settings->File Colors |
| To compare two directories, select one or both of them in the Project view and press Ctrl+D. | Чтобы сравнить два каталога, выберите один или оба из них в представлении Project и нажмите Ctrl+D. |
| To compare two jar files, select one or both of them in the Project view and press Ctrl+D. | Чтобы сравнить два jar-файла, выберите один или оба из них в представлении Project и нажмите Ctrl+D |
| В Студии есть отличная возможность сравнить выделенный блок с содержимым буфера обмена. Для этого выделите кусок кода, скопируйте в буфер, выделите еще один (тот что хотите сравнить), нажмите правую кнопку мыши и в контекстном меню выберите Compare with Clipboard | |
| You can exclude any file from your project. As a result, such a file will be ignored by indexing, inspection and code completion. In the Project tool window, select the file you want to ignore, and choose Mark as plain text in its context menu. If necessary, you can always return the file to its original type using the Mark as |
Вы можете исключить любой файл из своего проекта. В результате такой файл будет проигнорирован для индексирования, проверки и завершения кода. В окне инструмента Project выберите файл, который вы хотите игнорировать, и выберите Mark as plain text в его контекстном меню. При необходимости вы всегда можете вернуть файл в исходный тип, используя команду контекстного меню Mark as (file type) |
| Run->Clean And Rerun (Ctrl+F5) решает множество непонятных проблем при компиляции, решило, например, проблему с выводом сообщения "No match changes..." при добавлении нового класса в приложение. | |
| If you are working on a large project, with numerous TODO items, filter them by scopes. Use the Scope-Based tab in the TODO tool window to show only those items that pertain to the scope of interest. |
Если вы работаете над крупным проектом с многочисленными элементами TODO, отфильтруйте их по областям. Используйте вкладку Scope-Based в окне инструмента TODO, чтобы отображать только те элементы, которые интересуют.  |
| TODO tool window lets you preview each of the encountered TODO items - just click the preview button on the toolbar. | Окно инструмента TODO позволяет просмотреть каждый из обнаруженных элементов TODO - просто нажмите кнопку предварительного просмотра на панели инструментов. |
| The average person only uses 26% of their apps daily, while one in four apps are never used at all. helps you re-engage your existing app users through Google Search, for both Android and iOS. | Средний человек использует только 26% своих приложений ежедневно, в то время как одно из четырех приложений никогда не используются вообще. App Indexing позволяет повторно привлекать пользователей к существующим приложениям через Google Search, как для Android так и для IOS. |
| When working with a lengthy list of tasks, you don't need to delete them one by one. Select several tasks, using Shift or Control/Command keys, click the right arrow, and then click Remove. | При работе с длинным списком задач вам не нужно удалять их по одному. Выберите несколько задач, используя клавиши Shift или Control / Command, щелкните стрелку вправо и нажмите Remove. |
Документация и Помощь | Documentation & Help
| English | Русский + картинка (опционально) |
|---|---|
| To quickly see the documentation for a class or method at caret, press Ctrl+Q (View | Quick Documentation). | Для того чтобы посмотреть документацию для класа или метода находящегося под курсором нажмите Ctrl+Q (View | Quick Documentation).  |
| You can quickly navigate in the currently edited file with Ctrl+F12 (Navigate | File Structure). It shows the list of members of the current class. Select an element you want to navigate to and press the Enter key or the F4 key. To easily locate an item in the list, just start typing its name | Вы можете быстро перемещаться в текущем файле, открытом в редакторе с помощью Ctrl+F12 (Navigate | File Structure). Это показывает список членов этого класса. Выберите элемент и нажмите клавишу Enter или F4. Здесь также можно ускорить перемещение, начав набирать нужное имя. |
| When choosing a live template from a suggestion list, press Ctrl+Q to view quick documentation - to be sure you make a right choice. When in a Code Completion lookup, press Ctrl+Q to show documentation for a lookup item, including class constructors. | Выбирая нужный шаблон из списка предложений а также при автозаполнении в редакторе, например для выбора конструктора, нажмите Ctrl+Q, чтобы просмотреть быструю документацию и убедиться, что вы сделали правильный выбор.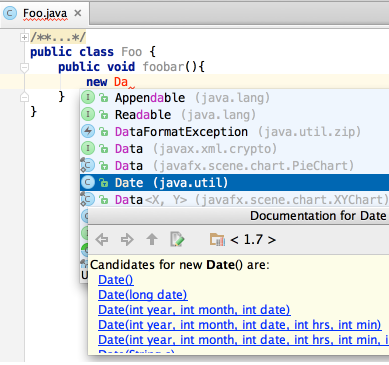 |
| To open your browser with documentation for the element at the editor's caret, press Shift+F1 (View | External Documentation). You must have the path to your browser set in the File | Settings | Web Browsers options and paths to documentation files added to your project (File | Project Structure...) to use this feature. | Для открытия документации элемента на котором находится курсор, нажмите Shift+F1 (View | External Documentation). Вы должны прописать путь в File | Settings | Web Browsers и путь к файлам документации в (File | Project Structure...) для использования этой возможности. |
| You may easily override methods of the base class by pressing Ctrl+O (Code | Override Methods). To implement methods of the interfaces that the current class implements (or of the abstract base class), use Ctrl+I (Code | Implement methods). | Можно быстро переопределить метод базового класса нажав Ctrl+O (Code | Override Methods). Для реализации методов интерфейсов, реализуемых текущим классом (а также методов базового абстрактного класса) используйте Ctrl+I (Code | Implement methods). |
| To navigate to the declaration of a class, method or variable used somewhere in the code, position the caret at the usage and press Ctrl+B (Navigate | Declaration). You can also click the mouse on usages with the Ctrl key pressed to jump to declarations. | Для того чтобы посмотреть определение класса, метода или переменной где то в коде, поставьте туда курсор и нажмите Ctrl+B (Navigate | Declaration). Вы также можете нажать на это мышью, держа при этом Ctrl, чтоб перейти к определению.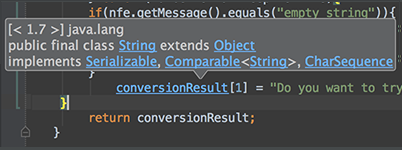 |
| Добавить новую Активити в проекте на AS просто - нажмите правой кнопкой на названии пакета, затем выберите New->Activity->Blank Aktivity, поставьте галку Generate Layout File и Launcher Activity для генерации менеджера размещения и добавления кода в Manifest файл. см. также http://metanit.com/java/android/1.5.php | |
| You don't need to invoke quick documentation explicitly (Ctrl+Q) - if you just move your mouse pointer over the desired symbol, the quick documentation pop-up window will show automatically. To enable this feature, select the check box Show quick doc on mouse move in the editor settings. |
Вызвать быструю документацию можно не напрямую (Ctrl+Q) - просто наведите курсор мыши на то что Вам нужно и всплывающее окно документации покажется автоматически. Чтобы включить эту функцию, установите флажок Show quick doc on mouse move в установках редактора. |
Редактор кода | Editor
| English | Русский + картинка (опционально) |
|---|---|
| Use the Switcher (Ctrl+Tab) to switch between open files and tool windows. Keeping Ctrl pressed, use the Up and Down arrow keys, Tab or Shift+Tab, Alt for navigation; use Delete or BackSpace to close editor tab or hide a tool window. | Используйте переключатель (Ctrl+Tab) для переключения между открытыми файлами и окнами инструментов. Удерживая нажатой клавишу Ctrl, используйте клавиши со стрелками вверх и вниз, Tab или Shift+Tab, Alt для навигации; используйте Delete или BackSpace, чтобы закрыть вкладку редактора или скрыть окно инструмента. |
| You can easily open an external file for editing, if you just drag it from the Explorer or Finder to the editor. | Открытие файла можно осуществить перетаскиванием в окно редактора из Explorer или Finder |
| There are two ways of closing all tabs in the editor, except the current one: First, right-click the editor tab, and choose Close Others on the context menu. Second, keeping the Alt key pressed, click 'X' on the editor tab. |
Существует два способа закрытия всех вкладок в редакторе, кроме текущей: Первый - щелкните правой кнопкой мыши вкладку редактора и выберите Close Others в контекстном меню. Во-вторых, удерживая нажатой клавишу Alt, нажмите «X» на вкладке редактора. 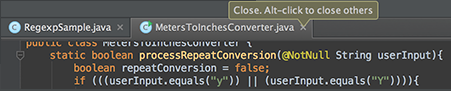 |
| Use Alt+Up and Alt+Down keys to quickly move between methods in the editor. | Используйте Alt+Up и Alt+Down для быстрого перемещения между методами в редакторе |
| Use F2/Shift+F2 keys to jump between highlighted syntax errors. Use Ctrl+Alt+Up/Ctrl+Alt+Down shortcuts to jump between compiler error messages or search operation results. To skip warnings right click on the validation side bar / marker bar and choose Go to high priority problems only. |
Используйте клавиши F2/Shift+F2 для перехода между подсвеченными синтаксическими ошибками. Используйте комбинацию клавиш Ctrl+Alt+Up/Ctrl+Alt+Down для перехода между сообщениями об ошибках компилятора или результатов операции поиска. Чтобы пропустить предупреждения - нажмите правой кнопкой мыши на side bar / marker bar (панель боковой проверки) и выберите Go to high priority problems only. |
| The Escape key in any tool window moves the focus to the editor. Shift+Escape moves the focus to the editor and also hides the current (or last active) tool window. The F12 key moves the focus from the editor to the last focused tool window. | Escape в любом окне инструмента перемещает фокус в редактор. Shift+Escape перемещает фокус в редакторе, а также скрывает текущее (или последнее активное) окно инструмента. Клавиша F12 перемещает фокус от редактора в последнее активное окно. |
| Alt+Backspace - возвращает к последнему месту редактирования | |
| If nothing is selected in the editor, and you press Ctrl+C, then the whole line at caret is copied to the clipboard. | Если в редакторе ничего не выбрано, и вы нажимаете Ctrl+C, вся строка, на которой стоит курсор копируется в буфер обмена. |
| You can easily make column selection by dragging your mouse pointer while keeping the Alt key pressed. | Можно выделить вертикальный блок с помощью мыши, держа при этом Alt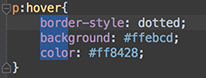 |
| To select multiple fragments in the "column mode", keep Control+Alt+Shift (on Windows and Linux) or Cmd+Alt+Shift (on MAC), and drag your mouse cursor | Чтобы выделить несколько фрагментов сразу в "блочном" режиме выделения, держите Control+Alt+Shift (on Windows and Linux) и Cmd+Alt+Shift (on MAC) и продолжайте выделение как обычно |
| Did you know that you can close tabs in the editor and the tool windows of Android Studio without actually using the context menu commands? It is enough to point with your mouse cursor to a tab to be closed, and click the middle mouse button, or just use the Shift+click combination. | Знаете ли вы, что вы можете закрыть вкладки в редакторе и инструментальные окна Android Studio без фактического использования команд контекстного меню? Достаточно указать с помощью курсора мыши на вкладку, которую нужно закрыть, и нажать среднюю кнопку мыши, или просто используйте комбинацию Shift+Click. |
| To open any class in the editor quickly, press Ctrl+N (Navigate | Class) and start typing the name of the class. Choose the class from a drop-down list that appears. | Чтобы быстро открыть любой класс в редакторе, нажмите Ctrl+N (Navigate | Class) и начните вводить имя класса. Выберите класс из раскрывающегося списка.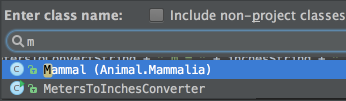 |
| You can open any file in your project in a similar way by using Ctrl+Shift+N (Navigate | File) | Ctrl+Shift+N (Navigate | File) организует быстрый поиск нужного файла по имени |
| To open any class or file in the editor at the desired line, press Ctrl+Shift+N (Navigate | File), start typing the name, and choose the one from the suggestion list. Then type the colon (:) and a line number. The selected file will open with the caret at the specified line. |
Чтобы открыть класс или файл в редакторе прямо в строке редактирования нажмите Ctrl+Shift+N (Navigate | File), начните писать имя и выберите нужное из списка, затем наберите символ ":" и номер строки. Выбранный файл откроется в нужной строке. |
| You can jump directly to any deeply buried file, if you press Ctrl+Shift+N, and type just a couple of characters of the enclosing directories and file names: | Вы можете напрямую перейти в какую нибудь глубоко спрятанный файл, если нажмете Ctrl+Shift+N и набирать просто по паре символов директории и файла: 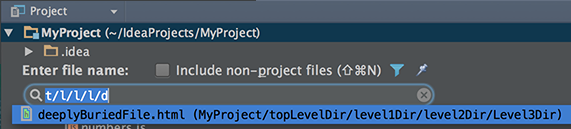 В качестве разделителя используйте либо косую черту, либо обратную косую черту. В качестве разделителя используйте либо косую черту, либо обратную косую черту. |
| Using Alt+Insert (Code | Generate) in the editor, you can easily generate getter and setter methods for any fields of your class. | С помощью Alt+Insert (Code | Generate) в редакторе, вы можете легко создавать методы get/set для любых полей вашего класса.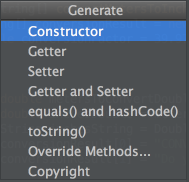 |
| To quickly select the currently edited element (class, file, method or field) in any view (Project view, Structure view or other), press Alt+F1. | Для быстрого выделения элемента (класса, файла, метода или поля) в каком либо виде (Project view, Structure view или другом), нажмите Alt+F1. |
| Keep your source code typo-free with the help of the built-in Spellchecker. All texts, including comments, textual strings and literals, are inspected against the pre-defined dictionaries. All typos are highlighted, which leaves you with the task of choosing the correct word, accepting the current spelling, or disabling inspection. Use Alt+Enter to see the list of available actions. |
Сделайте свой исходный код свободным от опечаток с помощью встроенного инструмента Spellchecker. Все тексты, включая комментарии, текстовые строки и литералы, проверяются по заранее определенным словарям. Все опечатки подсвечиваются, вам остается выбрать правильное слово, принять текущее правописание или отключить проверку. Используйте Alt+Enter, чтобы просмотреть список доступных действий. |
| If you lack words in the pre-defined dictionaries, you can create your own ones. A custom dictionary is a mere textual file with a .dic extension, with each word starting on a new line. All you have to do is to point to the directories where your dictionaries are stored, in the Spelling of the Settings dialog. |
Если вам не хватает слов в предустановленных словарях, вы можете создавать свои собственные. Пользовательский словарь это простой текстовый файл с расширением .dic, каждое слово, начинается с новой строки. Все, что вам нужно сделать, это указать каталоги, где ваши словари хранятся в меню Spelling диалога Settings |
| When you want to catch exceptions thrown by some code fragment, select it in the editor, press Ctrl+Alt+T (Code | Surround With) and choose try / catch. The catch blocks for all the exceptions thrown inside the block will be generated automatically. You can customize the bodies of the generated catch blocks on the Code tab of File | Settings | File and Code Templates. Use other items in the list to surround with other constructs. | Если вы хотите перехватить исключение во фрагменте кода, выделите его в редакторе, нажмите Ctrl+Alt+T (Code | Surround With) и выберите try / catch. Блок catch для всех исключений выброшенных в этом блоке сгенерируются автоматически. Вы можете сделать под себя тело блока catch во вкладке Code в File | Settings | File and Code Templates. |
| To navigate to the implementation(s) of an abstract method, position the caret at its usage or its name in the declaration and press Ctrl+Alt+B. | Для того, чтобы перейти к реализации(ям) абстрактного метода, в позиции курсора (курсор на имени или на объявлении) нажмите Ctrl+Alt+B. |
| Ctrl+W (extend selection) in the editor selects the word at the caret and then selects expanding areas of the source code. For example, it may select a method name, then the expression that calls this method, then the whole statement, then the containing block, etc. You can also select the word at the caret and the expanding areas of the source code by double-clicking the target areas in the editor. | Ctrl+W (расширенный выбор) в редакторе выбирает то что под курсором, а затем выбирает области исходного кода с этим выражением. Например, он может выбрать имя метода, выражение/оператор, кот. вызывает этот метод, все выражения, содержащий блок, и т.д. Вы можете также выбрать слово под курсором и все области исходного кода, дважды нажав на нужные лексемы в редакторе. |
| You can comment or uncomment lines and blocks of code using Ctrl+Slash and Ctrl+Shift+Slash. Ctrl+Slash comments or uncomments the current line or selected block with single line comments (//...). Ctrl+Shift+Slash encloses the selected block in a block comment (/*...*/). To uncomment a commented block press Ctrl+Shift+Slash anywhere inside it. | Можно быстро закомментировать или откомментировать строки и блоки кода используя Ctrl+Slash и Ctrl+Shift+Slash. Ctrl+Slash позволяет закомментировать или откомментировать выделенный блок однострочным комментарием (//...). Ctrl+Shift+Slash заключает выделенный блок в блочный комментарий (/*...*/). Для того чтобы "раскомментировать" блок нажмите Ctrl+Shift+Slash в любом месте внутри его. |
| Ctrl+D in the editor duplicates the selected block or the current line when no block is selected. | Ctrl+D в редакторе дублирует выделенный блок или текущую строку, если ничего не выделено. |
| If the cursor is between the parentheses of a method call, pressing Ctrl+P brings up a list of valid parameters. | Если курсор находится между скобками вызова метода, нажатие Ctrl+P выведет список допустимых параметров. |
| Ctrl+Shift+Backspace (Navigate | Last Edit Location) brings you back to the last place where you made changes in the code. Pressing Ctrl+Shift+Backspace a few times moves you deeper into your changes history. | Ctrl+Shift+Backspace (Navigate | Last Edit Location) возвращает вас на последнее место, где вы сделали изменения в коде. Нажатие Ctrl+Shift+Backspace несколько раз перемещает вас глубже в историю изменений. |
| Use Ctrl+Shift+F7 (Edit | Find | Highlight Usages in File) to quickly highlight usages of some variable in the current file. Use F3 and Shift+F3 keys to navigate through highlighted usages. Press Escape to remove highlighting. | Используйте Ctrl+Shift+F7 (Edit | Find | Highlight Usages in File) чтобы быстро выделить оператор или какую-либо переменную в текущем файле. Используйте F3 и Shift+F3 клавиши для навигации по подсвеченным сообщениям. Нажмите клавишу Escape, чтобы убрать выделение. |
| You can view all methods of the implemented interfaces in a class, if you place the caret at the implements keyword in the class declaration, press Ctrl+Shift+F7, and select the desired interface from the list: | Вы можете просмотреть все методы реализованных интерфейсов в классе, если вы поместите курсор в ключевое слово реализации в объявлении класса, нажмите Ctrl+Shift+F7 и выберите нужный интерфейс из списка: |
| Use Code | Reformat Code to reformat code according to your code style preferences (File | Settings | Code Style). You can also use Code | Optimize Imports to automatically optimize imports (remove unused imports, etc.). To access the corresponding settings, use File | Settings | Code Style | Imports. | Используйте Code | Reformat Code для переформатирования кода согласно Вашим предпочтениям стиля кода - (File | Settings | Code Style). Вы можете также использовать Code | Optimize Imports для автоматической оптимизации импорта (удаления неиспользуемого импорта и т.д.). Для доступа к этим настройкам используйте File | Settings | Code Style | Imports |
| To see your local history of changes in a file, invoke Local History | Show History from the context menu. You can navigate through different file versions, see the differences and roll back to any previous version. Use the same context menu item to see the history of changes on a directory. You will never lose any code with this feature! | Чтобы увидеть историю изменений в файле, вызовите Local History | Show History из контекстного меню. Вы можете перемещаться по различным версиям файлов, увидеть различия и откатиться к предыдущей версии. Используйте этот пункт контекстного меню, чтобы увидеть историю изменений в каталоге. Вы никогда не потеряете код с этой функцией! |
| Press Alt+Q (View | Context Info) to see the declaration of the current method without the need to scroll to it. | Нажмите Alt+Q (View | Context Info) чтобы увидеть объявление текущего метода без необходимости его поиска по коду. |
| Ctrl+E (View | Recent Files) brings a popup list of the recently visited files. Choose the desired file and press Enter to open it. Besides recent files, you can bring up results of the usage searches you have performed recently. To do that, use the same Ctrl+E shortcut with the Find tool window having the focus, and select the desired find usages result from the Recent Find Usages popup. | Ctrl+E (View | Recent Files) выводит список недавно посещенных файлов. Выберите нужный файл и нажмите Enter чтобы его открыть.  Помимо недавних файлов, вы можете просмотреть результаты поиска, которые вы недавно выполняли. Для этого используйте тот же самый ярлык Ctrl+E с инструментом «Найти» в фокусе, и выберите нужный результат из всплывающего окна «Recent Find Usages». 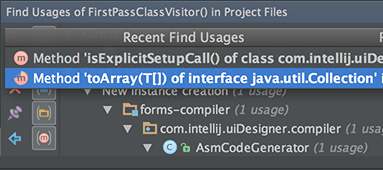 |
| To show separator lines between methods in the editor, open the editor settings and select the Show method separators check box in the Appearance page. | Для показа разделяющих линий между методами в редакторе, откройте установки редактора и выберите чекбокс Show method separators на странице Appearance.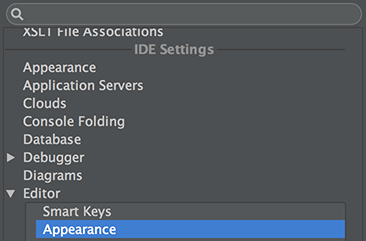  |
| Ctrl+Shift+J shortcut joins two lines into one and removes unnecessary space to match your code style. | Ctrl+Shift+J соединяет две строки в одну и удаляет ненужное пространство в соответствии с вашим стилем кода. |
| Use the Ctrl+Shift+V shortcut to choose and insert recent clipboard contents into the text. | Ctrl+Shift+V позволяет использовать буфер обмена с историей (множественный буфер) |
| To see the inheritance hierarchy for a selected class, press Ctrl+H (Navigate | Type Hierarchy). You can also invoke the hierarchy view right from the editor to see the hierarchy for the currently edited class. | Чтобы увидеть иерархию наследования выделенного класса нажмите Ctrl+H (Navigate | Type Hierarchy). Вы также можете вызвать представление иерархии прямо из редактора, чтобы увидеть иерархию для текущего редактируемого класса. 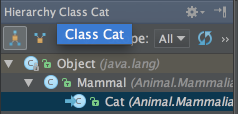 |
| To open any particular method or field in the editor quickly, press Ctrl+Alt+Shift+N (Navigate | Symbol) and start typing its name. Choose symbol from the drop-down list that appears. |
Чтобы быстро открыть какой-либо конкретный метод или поле в редакторе, нажмите Ctrl+Alt+Shift+N (Navigate | Symbol) и начните вводить его имя. Выберите нужное из раскрывающегося списка 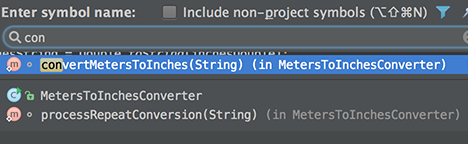 |
| With a single keystroke, you can apply another code style/coloring scheme or keymap right from the editor. Just press Ctrl+Back Quote (View | Quick Switch Scheme), to specify the scheme you want to change. | С помощью одного нажатия клавиши вы можете применить другую цветовую схему или раскладку клавиатуры непосредственно из редактора. Просто нажмите Ctrl+Back Quote (View | Quick Switch Scheme), чтобы выбрать схему.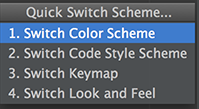 |
| Use Ctrl+Shift+I (View | Quick Definition), to quickly review definition or content of the symbol at caret, without the need to open it in a new editor tab. | Используйте Ctrl+Shift+I (View | Quick Definition), чтобы быстро посмотреть определение того что находится в данный момент под курсором без необходимости открытия новой вкладке в редакторе |
| The Edit | Copy Reference action can be used to insert a reference to a field/method/class/file into the current position in the editor. For example, go to the java.util.Collections JDK class, place the cursor within the EMPTY-MAP field and press Ctrl+Alt+Shift+C: Then return to your source code and press Ctrl+V: |
Действие Edit | Copy Reference может быть использовано для вставки ссылки на поле/метод / класс в текущую позицию в редакторе. Например, перейдите в класс JDK java.util.Collections, поставьте курсор в поле EMPTY-MAP и нажмите Ctrl+Alt+Shift+C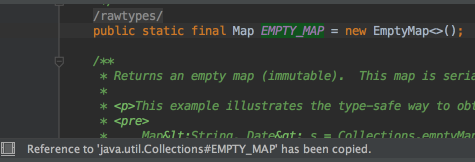 затем перейдите в свой исходный код и нажмите Ctrl+V: 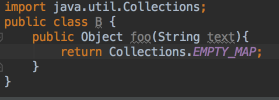 |
| The Code | Move Statement Up/Down action is useful for reorganizing the code lines in your file, e.g., for bringing a variable declaration closer to variable usage. Select a code fragment and press Ctrl+Shift+Up or Ctrl+Shift+Down. The following pictures show an initial location of a code fragment, and the results of moving the selected fragment up and down. |
Code | Move Statement Up/Down полезны для реорганизации строк кода в вашем файле, например, для приближения объявления переменной к использованию переменной. Выделите фрагмент кода и нажмите Ctrl+Shift+Up или Ctrl+Shift+Down. На следующих рисунках показано исходное местоположение фрагмента кода и результаты перемещения выбранного фрагмента вверх и вниз.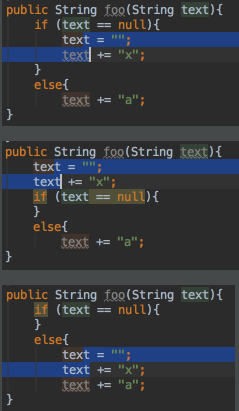 Когда в редакторе ничего не выделено, строка под курсором будет перемещена. |
| You can bring forward the list of all usages of a class, method or variable across the whole project, and quickly jump to the selected usage. To do that, place the caret at the symbol's name or at its usage in code and press Ctrl+Alt+7 (Edit | Find | Show Usages in the main menu), scroll the list and click the desired usage. | Вы можете вывести список мест где встречается класс, метод или переменная во всем проекте и быстро перейти к нужному месту. Для этого поместите курсор на названии и нажмите Ctrl+Alt+7 (Edit | Find | Show Usages в главном меню), прокрутите список и выберите нужное место. |
| Enable the horizontal scrolling with the mouse wheel by holding the Shift key. | Горизонтальная полоса прокрутки в редакторе возможна с помощью колеса мыши, при этом держите на клавиатуре Shift |
| When searching for a text string in a file, use recent history: with the search pane already open, click the down arrow to show the list of recent entries. | При поиске текстовой строки в файле используйте недавнюю историю: если панель поиска уже открыта, щелкните стрелку вниз, чтобы отобразить список последних записей. |
| When you are finding text in the current file (Ctrl+F), you don't need to type the whole search string: Basic Code Completion is available in the search field. Start typing, press Ctrl+Space, and select the desired string from the suggestion list. | Когда вы ищете текст в текущем файле (Ctrl+F), нет необходимости писать всю строку для поиска, вам доступно автодополнение по Ctrl+Space. Начните вводить текст и выберите нужную строку из списка |
| To view all exit points of a method, place the caret at one of them, e.g. the return statement, and press Ctrl+Shift+F7: | Чтобы посмотреть все точки выхода метода, поместите курсор на один из них, например return, и нажмите Ctrl+Shift+F7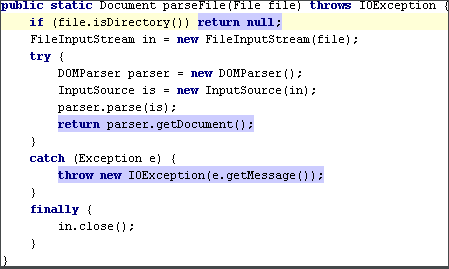 |
| You can view all statements within the method where certain exceptions can be caught. Just place the caret at the throws keyword in a method declaration, press Ctrl+Shift+F7 and select the desired exception class from the list. This will also work for try and catch. | Вы можете посмотреть все выражения внутри метода, где могут быть отловлены определенные исключения. Просто поместите курсор в ключевое слово throws в объявлении метода, нажмите Ctrl+Shift+F7 и выберите нужное исключение из списка. Это также работает для try и catch.  |
| Ctrl+Click (on Windows) or Cmd+Click (on MacOS) a tab in the editor to navigate to any part of the file path. Select the necessary element in the drop-down, and the corresponding file path opens in an external browser (e.g., in the Explorer, if your OS is Windows). | 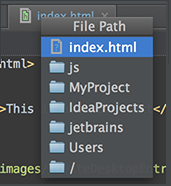 |
| Android Studio helps create test cases directly from class declaration. With the caret at the class name in the editor, press Alt+Enter, and choose Create Test from the suggestion list: | Android Studio помогает создавать тестовые примеры непосредственно из объявления класса. Если курсор установлен на имени класса в редакторе нажмите Alt+Enter и выберите Create Test в предложенном списке: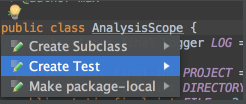 |
| It is very easy to toggle between find and replace functionality. When you perform search and replace in a file, pressing Ctrl+F shows the search pane. Pressing Ctrl+R adds field, where you can type the replace string. While in the Find in Path dialog, you can switch to replace by pressing Ctrl+Shift+R. Same way, press Ctrl+Shift+F to hide the Replace with field, and switch to mere search. |
Когда вы выполняете поиск и замену в файле, нажатие Ctrl+F показывает панель поиска. Нажатие Ctrl+R добавляет поле, где вы можете ввести строку для замены. В диалоговом окне «Find in Path» вы можете переключиться на замену, нажав Ctrl+Shift+R. То же самое, нажмите Ctrl+Shift+F, чтобы скрыть поле «Заменить», и переключитесь на простой поиск |
There are two ways of closing all tabs in the editor, except the current one:
First, right-click the editor tab, and choose Close Others on the context menu.
Second, keeping the Alt key pressed, click on the editor tab.
You can also use Basic Completion (Ctrl+Space) in HTML, CSS and JavaScript files, for completing attributes, parameters, tags, selectors, etc.
You can easily select multiple fragments of text. To do that, it's enough to keep Alt+Shift and drag your mouse cursor:
#ПЕЧАТЬ
Make your printouts (File | Print) nice and informative with the help of keywords.
For example, use $DATE$ and $TIME$ to specify the exact date and time of the printout.
Автозавершение кода | Code completion
| English | Русский + Картинка (опционально) |
|---|---|
| Use Basic Completion (Ctrl+Space) for completing words in text and comments in files of many different types. All the words from the current file that start with the typed prefix will appear in the lookup list. | Используйте автозавершение (Ctrl+Space) для завершения слов в тексте или комментарии в файлах различных типов. Все слова из текущего файла будут использованы в списке автозаполнения при написании начальных символов. 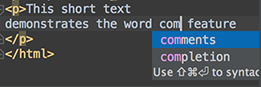 |
| The Code Completion feature lets you quickly complete different kinds of statements in the code. For example, start typing a class name and press Ctrl+Space to complete it. When multiple choices are available, they are shown in the lookup list. | Функция завершения кода позволяет быстро выполнять различные типы инструкций в коде. Например, начните вводить имя класса и нажмите Ctrl+Space, чтобы завершить его. Когда доступно несколько вариантов, они отображаются в списке поиска.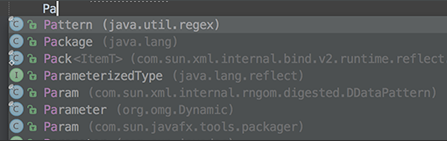 |
| When using basic code completion (Ctrl+Space), you don't need to type upper-case letters in CamelHump names. It is enough to type the initial letters of the camel names in lower case, and they will be smartly recognized. | При использовании обычного автозавершения кода (Ctrl+Space) вам не нужно вводить буквы верхнего регистра в именах при "верблюжьей нотации". Достаточно ввести начальные буквы имен верблюжьих "горбов" в нижнем регистре, и они будут хорошо распознаны. |
| The SmartType code completion greatly helps to find methods and variables that are suitable in the current context, by analyzing the expected type of the whole expression. So doing, Android Studio pinpoints the top five most suitable results and highlights them on the blue background. For example, type Calendar now = new GregorianCalendar(T); and press Ctrl+Shift+Space: The SmartType completion also works after the return keyword, in an assignment, in an argument list of a method call and other places. | Автозавершение кода под названием SmartType помогает найти методы и переменные ожидаемого типа, подходящие к текущему контексту кода путем его анализа. Таким образом, Android Studio выявляет пять наиболее подходящих результатов и подсвечивает их голубым. Например, напишите  и нажмите Ctrl+Shift+Space: 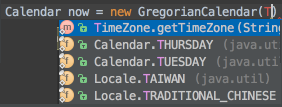 Завершение кода SmartType также работает после ключевого слова return, в присваивании, в списке аргументов при вызове метода и других местах. |
| The SmartType code completion may be used after the new keyword, to instantiate an object of the expected type. For example, type and press Ctrl+Shift+Space: |
Автозавершение кода SmartType может быть использовано после ключевого слова new для создания объекта ожидаемого типа. Для примера наберите: и нажмите Ctrl+Shift+Space: 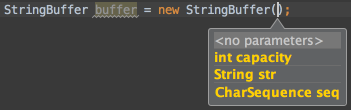 |
| When using Code Completion, you can accept the currently highlighted selection in the popup list with Tab key. Unlike accepting with the Enter key, the selected name will overwrite the rest of the name to the right of the caret. This can be especially useful for replacing one method or variable name with another. | При использовании «автозавершения кода» вы можете принять выбранный в данный момент пункт во всплывающем списке с помощью клавиши Tab. В отличие от принятия клавишей Enter, выбранное имя перезапишет оставшуюся часть имени справа от каретки. Это может быть особенно полезно для замены одного метода или имени переменной другим. |
| When you need to cast an expression value to the required type the SmartType code completion will help you. For example, type String s = (|caret is here| and press Ctrl+Shift+Space to see what happens. |
Автозавершение кода SmartType помогает также для поиска возможного приведения типов. Например, напишите: String s = (|курсор здесь| нажмите Ctrl+Shift+Space и посмотрите что произойдет |
| The CodeCompletion feature can suggest a name for a variable when you declare it. For example, start typing and press Ctrl+Space. You can customize name prefixes for local variables, parameters, instance and static fields in File | Settings | Code Style. |
Функция автозавершения кода может подсказать имя переменной во время объявления. Например, начните писать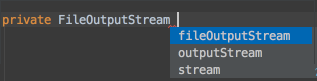 и нажмите Ctrl+Space. Вы можете сами настроить префиксы для имен локальных переменных, параметров, экземпляров и статических полей в File | Settings | Code Style |
| When using basic code completion (Ctrl+Space), type any characters that exist anywhere in an identifier. | При использовании автозавершения кода (Ctrl+Space), пишите любые символы, встречающиеся в идентификаторе |
| Try Live Templates Live Templates allow you to generate many typical code constructs in seconds! For example, type String[] array1, array2; itar~ in a method and press the Tab key to see what happens. Use the Tab key to move between the template fields. See File | Settings | Live Templates for more details. |
Живые шаблоны позволяют Вам генерировать много типичных конструкций кода буквально за секунды! Например, начните писать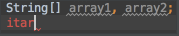 в методе и нажмите клавишу Tab чтобы посмотреть что получится. 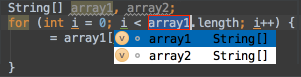 используйте клавишу Tab для перемещения между полями. Посмотрите File | Settings | Live Templates для дополнительной инфрмации. |
| Use Ctrl+J to complete any valid Live Template abbreviation if you don't remember it. For example, type it and press Ctrl+J to see what happens. | Используйте Ctrl+J для завершения Живого Шаблона (Live Template) если Вы его не помните. Для примера, наберите "it" и нажмите Ctrl+J чтобы увидеть что происходит. |
| The shortcuts such as Ctrl+Q (View | Quick Documentation), Ctrl+P (View | Parameter Info), Ctrl+B (Navigate | Declaration) and others can be used not only in the editor but in the code completion popup list as well. | Быстрые клавиши Ctrl+Q (View | Quick Documentation), Ctrl+P (View | Parameter Info), Ctrl+B (Navigate | Declaration) и другие могут быть использованы не только в редакторе, но в выпадающем списке дополнения кода. |
| When using Code Completion, you can accept the currently highlighted selection in the popup list with the period character (.), comma (,), semicolon (;), space and other characters. The selected name is automatically entered in the editor followed by the entered character. |
При использовании завершения кода, вы можете принять выделенный в данный момент выбор в списке с помощью точки (.), запятой (,), точки с запятой (;), пробела и других символов. Выбранное имя автоматически вводится в редакторе следом за введенными символами. |
| For the pattern search in the Go to Class, Go to Symbol and Go to File pop-up frames, use * and space symbols. * stands for any symbol. Space at the end means the end of a pattern, and the preceding string will be considered not just a prefix but a whole pattern. The list of the suggested names will be reduced accordingly. |
Для поиска шаблонов во всплывающий окнах Go to Class, Go to Symbol и Go to File используйте звездочку (*) и пробел. Пробел в конце означает конец шаблона, и предыдущая строка будет считаться не просто префиксом, а целым шаблоном. Соответственно сократится список предлагаемых имен.  |
| When in the Go to Class, Go to Symbol, or Go to File popup, you can ease the search by filtering the lookup list with the help of the "camel words" prefixes. | Когда используете всплывающие окна Go to Class, Go to Symbol, or Go to File, вы можете быстро найти нужное используя т.н. способ "горбатого регистра" (стиль написания составных слов, при котором несколько слов пишутся слитно без пробелов с большой буквы) |
| Use Ctrl+Shift+Enter to complete a current statement such as if, do-while, try-catch, return (or a method call) into a syntactically correct construct (e.g. add curly braces). | Используйте Ctrl+Shift+Enter для завершения текущего выражения, такого как if, do-while, try-catch, return (или вызов метода) синтаксически грамотной конструкцией (к примеру фигурными скобками) 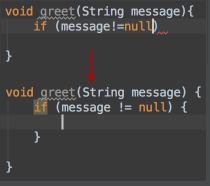 |
| The Quick Definition Viewer (Ctrl+Shift+I) can also be used for items in lookup lists that appear on code completion and class/file/symbol navigaton commands. | Средство просмотра Quick Definition Viewer (Ctrl+Shift+I) также может использоваться для элементов в списках поиска, которые появляются при завершении кода и командах навигации class/file/symbol. |
| When you press Alt+Enter to invoke a quick fix or intention action, press the right arrow key to reveal the list of additional options. Depending on the context, you can choose to disable inspection, fix all problems, change inspection profile, etc. |
Когда вы нажимаете Alt+Enter, чтобы вызвать быстрое исправление или c другим намерением, нажмите клавишу со стрелкой вправо, чтобы открыть список дополнительных параметров. В зависимости от контекста вы можете отключить проверку, исправить все проблемы, изменить профиль проверки и т.д.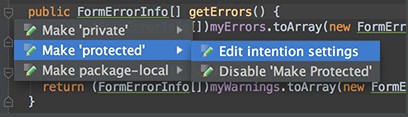 |
To quickly complete a method call of a static method located anywhere in your project, libraries or JDK, enter a prefix and press Ctrl+Space twice. You'll see all the matching methods. If you want the method you chose to be imported statically, press Alt+Enter and see what happens:
When an autopopup completion is active, Ctrl+Down and Ctrl+Up will close it and move the caret down or up in the editor. /Когда работает автодополнение Ctrl+Down и Ctrl+Up переводят курсор в редактор вниз или вверх/
When using Code Completion, you can accept the currently highlighted selection in the popup list with the Ctrl+Shift+Enter, Android Studio will not just insert the selected string, but also will do its best to turn current code construct into syntactically correct one (balance parentheses, add missing braces and semicolons, etc.)
When using Code Completion in Java, you can accept the currently highlighted selection in the popup list with the exclamation sign (!) character. It will be inserted before the boolean method or variable you were completing, thus negating the whole expression. /При использовании автозавершения кода в Java, вы можете принять выделенный в данный момент выбор в раскрывающемся списке автозавершения нажав восклицательный знак (!). Он будет вставлен перед булевым выражением или переменной, которую вы заканчивали, отрицая его (ее)./
When you invoked Basic Completion (Ctrl+Space) in Java and didn't find your desired class in the list, it means that it's not yet imported in current file. Pressing Ctrl+Space once more to view all accessible classes.
/При вызове стандартного завершения кода (Ctrl + Space) в Java и не нашли нужного класса в списке, это означает, что он еще не импортирован в текущем файле. Нажмите Ctrl + Space еще раз, чтобы просмотреть все доступные классы./
Pressing the same shortcut after you have invoked Smart-type Completion when an array type is expected will search for collections with same component type and suggest to convert them using toArray() call.
/После того, как вы используя Smart-завершение кода, когда, например, ожидается тип массива, Studio будет искать преобразование коллекций этого типа компонентов и предложит, чтобы преобразовать их с помощью вызова ToArray()./
Postfix code completion is applied "from right to left" and lets you avoid backward caret jumps when coding. After the code fragment that you want to change, type a dot (.), optionally press Ctrl+J and select the desired option.
/постфиксный вариант завершения кода применяется "справа-налево" и позволяет избежать скачков курсора при кодировании. после фрагмента кода, который вы хотите изменить, напишите точку (.), нажмите Ctrl+J и выберите нужную опцию./
A special variant of the Code Completion feature invoked by pressing Ctrl+Space twice allows you to complete XML tag names from namespaces not declared in the current file. If the namespace is not declared yet the declaration is generated automatically.
/Специальный вариант функции дополнения кода вызывается нажатием Ctrl + Space дважды Позволяет завершить имена XML-тегов из пространств имен не объявленных в текущем файле. Если пространство имен пока не объявлено оно генерируется автоматически./ см. /media/si/KINGSTON/mywiki/AndroidStudio/xml_code_completion.png
//отл пример преобразвания ArrayList в массив строк
void foo() {
List
String[] p = strings.toArray(new String[strings.size[0]);
}
Ctrl+Alt+Left - назад, где стоял курсор
You can create code constructs using statement completion. Start typing a method declaration or a statement, and press Ctrl+Shift+Enter after the opening parenthesis. The braces are created, with the caret placed inside:
To view which line separators style is used in the current file, look at the Status Bar: LF или CR/LF
To change the current line ending style, just click the spinner.
You do not need to open a file in the editor to change its line separator style. Use the Project tool window instead: select one or more files, or folders, point to File | Line Separators on the main menu, and then choose the desired line ending style.
For a directory, new line separator applies recursively.
#BOOKMARKS /Закладки/
To create a bookmark with mnemonics
Place the caret at the desired line of code in the editor.
Press Ctrl+F11 (alternatively, choose Navigate | Bookmarks | Toggle Bookmark With Mnemonic on the main menu) , then press one of the keys 0-9 or A-Z.
You want your bookmarks and breakpoints to be always at hand, so that you can easily navigate through them?
They are visible in the Favorites tool window, which you can dock or float as required:
Работа с файлами *.properties
| English | Русский + картинка (опционально) |
|---|---|
| You can use Basic Completion (Ctrl+Space) within Java String literals and in other file types, for completing .properties keys. | Вы можете использовать автодополнение (Ctrl+Space) как для строковых данных Java, так и для других типов файлов, например, ключей .properties. |
All escaped characters in the *.properties files in the format \uXXXX, are displayed in the resource bundle editor as un-escaped unicode literals.
Vice versa, if a non-ASCII character is entered in the resource bundle editor, it is reflected in the underlying *.properties file as a corresponding escaped character in the format \uXXXX.
For example, if the *.properties file contains a property value
Обновление эмулятора в AStudio:
Your emulator is out of date, please update by launching Android Studio:
- Start Android Studio
- Select menu "Tools > Android > SDK Manager"
- Click "SDK Tools" tab
- Check "Android SDK Tools" checkbox
- Click "OK"
Рефакторинг
| English | Русский + картинка (опционально) |
|---|---|
| You can easily rename your classes, methods and variables with automatic correction of all places where they are used. To try it, place the caret at the symbol you want to rename, and press Shift+F6 (Refactor | Rename). Type the new name in the popup window that appears, or select one of the suggested names, and press Enter. | Вы можете легко переименовать свои классы, методы и переменные с автоматической коррекцией имен во всех местах, где они используются. Чтобы попробовать это, поместите курсор внутри имени, которое вы хотите изменить, и нажмите Shift+F6 (Refactor | Rename). Введите новое имя в появившемся всплывающем окне или выберите одно из предлагаемых имен и нажмите Enter. |
| When you invoke the Move refactoring (F6) on an inner class that is declared static, you are provided with an option to either make it a top-level class, or move it to another class. | Когда Вы используете рефакторинг для перемещения (F6) во внутреннем классе, который объявлен статическим, Вам предоставляется возможность либо сделать его классом более высокого уровня, либо перенести его в другой класс.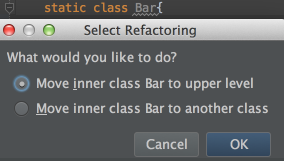 |
| The Extract Variable refactoring helps you simplify complicated statements in your code. For example, in the code fragment below, you can select an expression in the code and press Ctrl+Alt+V (Refactor | Extract | Variable...). This will result in the following: | Рефакторинг типа Extract Variable (Извлечь переменную) помогает упростить сложные конструкции в коде. Например во фрагменте кода, показанном ниже, Вы можете выделить выражение в коде и нажать Ctrl+Alt+V (Refactor | Extract | Variable...). Результат показан ниже: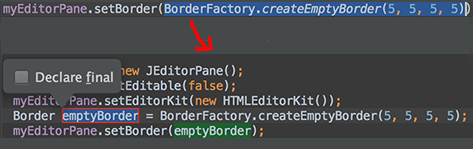 |
| You can use the Extract Variable refactoring even on incomplete statements. Just press Ctrl+Alt+V, and choose the desired expression: | Вы можете использовать рефакторинг Extract Variable (Извлечь переменную) даже в незаконченном выражении. Просто нажмите Ctrl+Alt+V и выберите нужное выражение.  |
| Use Refactor | Copy to create a class which is a copy of the selected class. This can be useful, for example, when you need to create a class which has much in common with some existing class and it's not feasible to put the shared functionality in a common superclass. | Используйте Refactor | Copy, чтобы создать класс, который является копией выбранного класса. Это может быть полезно, например, когда вам нужно создать класс, который имеет много общего с некоторым существующим классом, и не представляется возможным поместить общую функциональность в суперкласс. |
| If you place the caret at certain symbol and press Ctrl+Alt+Shift+T, you will see the list of refactorings applicable to the current context. | Если поместить курсор в некоторую область и нажать Ctrl+Alt+Shift+T, можно увидеть список возможных улучшений кода в текущем контексте |
ОТЛАДЧИК
| English | Русский + картинка (опционально) |
|---|---|
| By pressing Alt+Shift+F10 you can access the Run/Debug dropdown on the main toolbar, without the need to use your mouse. | Нажатием Alt+Shift+F10 можно папасть в элемент управления Run/Debug расположенный в панели инструментов без использования мыши. |
| Right-clicking on a breakpoint marker (on the bar to the left from the text) invokes the speedmenu where you can quickly enable/disable the breakpoint or adjust its properties. | Нажатие правой кнопки мыши на маркере точки останова (находится слева от текста в редакторе) вызывает меню, которое позволит разрешить/запретить точку останова или настроить ее свойства  |
| In Android Studio 2.3 and higher, Instant Run significantly reduces the time it takes to update your app with code and resource changes. After deploying your app to a target device running Android 5.0 (API level 21) or higher, you can click Apply Changes to push certain code and resource changes to your running app without building a new APK—and, in some cases, without even restarting the current activity. The Run and Debug buttons are always available to you when you want to push your changes and force an app restart. However, you may find that using the Apply Changes button provides a faster workflow for most incremental changes to your app. You can also press Control + F10 (or Control + Command + R on Mac) to apply changes with Instant Run. https://developer.android.com/studio/run/index.html#instant-run%22 | В Android Studio 2.3 и более поздних версиях Instant Run значительно сокращает время, необходимое для обновления приложения при изменении кода и ресурсов. После развертывания приложения на целевом устройстве под управлением Android 5.0 (уровень API 21) или более поздней версии нажмите Apply Changes / «Применить изменения», чтобы направить определенные изменения кода и ресурсов в запущенное приложение без создания нового APK, а в некоторых случаях без перезагрузки текущей активности. Кнопки «Выполнить» и «Отладка» всегда доступны для вас, когда вы хотите применить ваши изменения и принудительно перезапускать приложение. Однако вы можете обнаружить, что кнопка «Применить изменения» обеспечивает более быстрый рабочий процесс для большинства постепенных изменений в вашем приложении. Вы можете нажать Control + F10 (или кнопка "молния") |
| To easily evaluate the value of any expression while debugging the program, select its text in the editor (you may press a Ctrl+W a few times to efficiently perform this operation) and press Alt+F8. | Нетрудно оценить значение любого выражения при отладке программы, выделите его текст в редакторе (вы можете несколько раз нажать Ctrl+W, чтобы эффективно выполнить эту операцию) и нажмите Alt+F8. |
| To quickly evaluate the value of any expression while debugging the program, hold Alt and click this expression to see its value and calculate it, call a method, etc. | Для того, чтобы быстро оценить значение любого выражения во время отладки программы, удерживайте Alt и нажмите это выражение, чтобы увидеть его значение и вычислить его, вызвать метод и т.д.  |
КОНТРОЛЬ ВЕРСИЙ | Version Control
| English | Русский + картинка (опционально) |
|---|---|
| Android Studio прекрасно работает с Системами Контроля Версий (VCS от англ. Version Control System) подключенными к проекту | |
| Use Alt+Shift+C to quickly review your recent changes to the project. | Используйте Alt+Shift+C чтобы быстро просмотреть последние изменения в проекте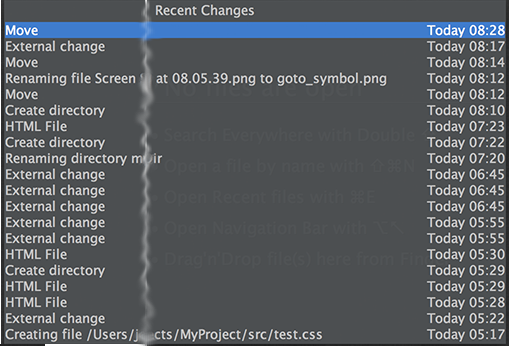 |
| All your most indispensable VCS commands are just one-click away... Choose VCS | VCS Operations Popup on the main menu, and get a popup with the VCS commands that are relevant to the current context: |
Все ваши самые необходимые команды VCS лишь одним щелчком мыши ... Выберите VCS | VCS Operations Popup в главном меню, и получите всплывающее окно с командами VCS, которые имеют отношение к текущему контексту:  |
| The Version Control tool window shows all deleted, modified, and unversioned files in a single view. Use keyboard shortcut to show or hide this tool window. From the Changes tool window you can perform all the necessary version control actions: commit changes, manage changelists, put resources under version control, examine differences and more. |
Окно инструмента Version Control отображает все удаленные, измененные и неотслеживаемые файлы в одном представлении. Используйте сочетание клавиш, чтобы показать или скрыть это окно инструмента. В окне инструмента Changes вы можете выполнить все необходимые действия по управлению версиями: зафиксировать изменения, управлять списками изменений, поместить ресурсы в систему контроля версий, изучить различия и многое другое. |
| You can move any file to a changelist of your choice. To do that, just choose Move to Another Changelist on the file context menu in the Version Control tool window: | Вы можете переместить любой файл в список изменений по вашему выбору. Для этого просто выберите Move to Another Changelist в контекстном меню файла в окне инструмента управления версиями: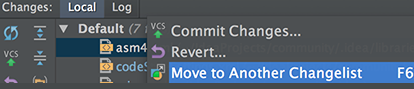 |
| If you don't want to commit some of your changes to the repository, you can set them aside for a while, by moving to a separate changelist, or by putting them to a shelf. Select such file in the Local tab of the Changes tool window, and on the context menu choose Move to Another Changelist, or Shelve Changes. | Если вы не хотите сделать коммит для некоторых изменений в репозитории, вы можете отложить их на некоторое время, путем перехода к отдельным спискам изменений, или помещая их на полке /shelf/. Выберите этот файл на вкладке Local окна инструмента контроля версий, и в контекстном меню выберите команду Move to Another Changelist, или Shelve Changes. |
| Android Studio lets you jump from your check-in comment to an issue in your task tracker. All you have to do is to define issue navigation patterns in the Settings | Version Control | Issue Navigation dialog: When you commit a changelist, and type the check-in comment, make sure it matches one of your issue navigation patterns. Later, when you browse through the changelists in the repository, such comments turn into hyperlinks: |
Android Studio позволяет переходить от вашего комментария к проблеме в вашем трекере задач. Все, что вам нужно сделать, это определить шаблоны навигации проблемы в Settings | Version Control | Issue Navigation: 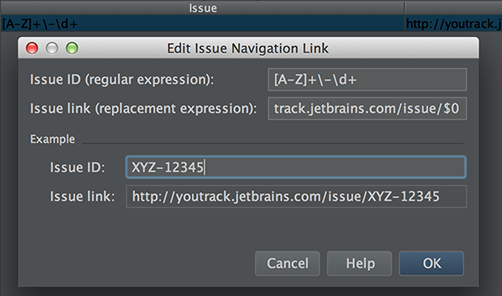 Когда вы фиксируете список изменений (делаете коммит) и вводите комментарий для проверки, убедитесь, что он соответствует одному из шаблонов навигации по проблеме. Позже, когда вы просматриваете списки изменений в репозитории, такие комментарии превращаются в гиперссылки: 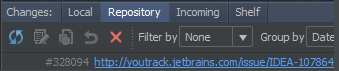 |
| The keyboard shortcut Ctrl+K enables you to quickly invoke the Commit Changes dialog. This dialog shows all modifications in project, gives summary information of file status and suggests improvements before check-in. |
Комбинация клавиш Ctrl+K позволяет быстро вызвать диалог фиксации изменений (Commit Changes). Этот диалог показывает все изменения в проекте, дает сводную информацию о статусе файлов и предлагает улучшения перед регистрацией изменений. |
| Version control annotations show the latest changes of each line in one click. Just right-click an annotation and use the Show Diff command in the context menu. |
Аннотации контроля версий показывают последние изменения каждой строки одним щелчком мыши. Просто щелкните правой кнопкой мыши аннотацию и используйте команду Show Diff в контекстном меню. 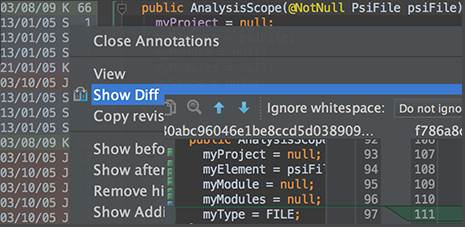 |
File | Settings и в левой части выбираем Version Control | Git. (см. http://developer.alexanderklimov.ru/android/studio/git.php)
после подключения git "руками" (git init):
10:56:55 Unregistered VCS root detected
The directory /home/si/AndroidStudioProjects/SmeltingController/Application/src/main is under Git, but is not registered in the Settings.
Add root Configure Ignore - выбираем Add root,получаем в Settings установленную систему контроля версий (аналогичный результат можно получить VCS | Import into Version Control | Create Git Repository).
You can move any file to a changelist of your choice. To do that, just choose Move to Another Changelist on the file context menu in the Changes tool window:
После создания репозитория через AS получаем следующее:
si@fregat ~/AndroidStudioProjects/Thermocontroller/app/src/main $ git status
На ветке master
Начальный коммит
Неотслеживаемые файлы:
(используйте «git add …», чтобы добавить в то, что будет включено в коммит)
AndroidManifest.xml
java/
res/
ничего не добавлено в коммит, но есть неотслеживаемые файлы (используйте «git add», чтобы отслеживать их)
теперь удаляем .git
$ rm -R .git/
и делаем через CLI
$ git init
структура каталогов такая же!!!
после $ git status точно такая информация!!!
действия $ git add AndroidManifest.xml
аналогичны вызову правой кнопки на AndroidManifest.xml в окне Project и вызову Git->Add
далее ...
ОТКРЫТЬ/ЗАКРЫТЬ ПРОЕКТ
Открыть проект Eclipse
HTML
| English | Русский + картинка (опционально) |
|---|---|
| Use Basic Completion (Ctrl+Space) within HTML, CSS and other files, for completing image file names. | Используйте автозавершение кода (Ctrl+Space) в HTML, CSS и других файлах для завершения имени файла изображения, например. |
You can quickly review all styles currently applied to an HTML tag, by right-clicking the tag name and selecting Show Applied Styles For Tag from the context menu:
You can quickly view the image referenced at caret by using the Quick Definition (Ctrl+Shift+I). The underlying image will be opened in a popup instead of a separate editor tab.
It is possible to rename CSS selectors directly from HTML. Position the caret at the selector to be renamed and press Shift+F6 (Refactor | Rename).
Speed up HTML, XML or CSS development with Emmet.
Enable this framework in the corresponding page of the Editor | Emmet node (Settings/Preferences):
#DIFF
Have you noticed the buttons >>
You can simply apply differences between panes, by clicking one of these chevron buttons.
Keep the Ctrl key pressed, and the chevron buttons change to
| |
^^ | | ^^^
^^^^ ^^^^
. Click one of these buttons to append contents of the current pane of the Differences viewer to the other pane.
If you keep Shift pressed, the chevrons turn into X . Click this button to revert changes.
#SCRATCH FILES
/media/si/KINGSTON/mywiki/AndroidStudio/scretch-f.png
SCRATCH FILES
| English | Русский + картинка (опционально) |
|---|---|
| Scratch files allows you experiment and prototype right in the editor, without creating any project files. To create a scratch file, press Ctrl+Alt+Shift+Insert, and then select its language. |
Scratch файлы позволяют экспериментировать и создавать программные этюды прямо в редакторе, не создавая никаких файлов проекта. Чтобы создать scratch файл, нажмите Ctrl+Alt+Shift+Insert, а затем выберите его язык.  |
| https://www.jetbrains.com/help/idea/2016.3/scratches.html IntelliJ IDEA provides a temporary editor. You can create a text or a piece of code for search or exploration purposes. IntelliJ IDEA suggests two types of temporary files: Scratch files The scratch files are fully functional, runnable, debuggable, etc. They require a language to be specified and have an extension. The scratch files are created via Ctrl+Alt+Shift+Insert. Scratch buffers The scratch buffers are only intended for pure editing, and as such they do not require specifying a language and do not have an extension. The scratch buffers belong to .txt type by default. This action has no dedicated shortcut, but you can configure one as described in the section Configuring Keyboard Shortcuts. Buffer files are reused after creating 5 files. So doing, after reuse, the content and language are reset. |
На сайте jetbrains https://www.jetbrains.com/help/idea/2016.3/scratches.html читаем описание концепции scratch файлов. В IntelliJ IDEA есть временный редактор. Вы можете создать текст или фрагмент кода для поиска решения или в целях проверки. IntelliJ IDEA предлагает два типа временных файлов: Scratch файлы Скретч-файлы являются полностью функциональным, работоспособным кодом, есть возможность отладки. Для работы необходимо лишь определить язык и расширение. Скретч-файлы создаются с помощью Ctrl+Alt+Shift+Insert. Scratch буферы Scratch буферы предназначены для чистого редактирования, и поэтому они не требуют указания языка и не имеют расширения и относятся к типу .txt по умолчанию. Буферные файлы используются для создания всего 5 файлов. Таким образом, при последующем использовании буферов содержимое и язык буферов сбрасываются. |
| To see all the available scratch files, choose Scratches view in the Project tool window. | Посмотреть имеющиеся scretch-файлы можно в окне инструмента Project |
/.../
/...../
Executability for Java scratch files was added in IntelliJ 15, so you must upgrade for that feature.
You have several option how to run/debug the scratch file:
Click the icon next to the main method/class
Hit Control+Shift+R (Control+Shift+F10 on Linux/Windows) somewhere within the scratch file
Right click inside the method/class and select appropriate run/debug option
/.../
#THEME EDITOR
https://developer.android.com/studio/write/theme-editor.html
Tools menu, click Android > Theme Editor.
#РАЗНОЕ
/home/si/AndroidStudioProjects/Wavdroid/app/Translations Editor - переводчик для ресурсов??? не нашел
You can inject SQL into a string literal (Alt+Enter | Inject language or reference |
Переключение между вкладками Design & Text в разметке:
ALT + SHIFT + LEFT/RIGHT on windows and ubuntu.
CTRL + SHIFT + LEFT/RIGHT on MAC
- Войдите или зарегистрируйтесь, чтобы отправлять комментарии
|
Позиция сайта в рейтинге:
|
Дружественные сайты: |